Thursday, October 28, 2010

Harvest Bark & Another Freebie Halloween Printable!!


This week seems to have turned out to be a busy one here at the Sinful Southern Sweets household. I always said I thought I might raise unsocial children so I would not be one of those moms that was running all over town every night of the week. But, alas, it appears my oldest Runwild Princess has decided she does not want to be unsocial. So, in turn that means her mother may not be unsocial. So, we're participating in gymnastics, Girl Scouts, falls festivals, trick or treating and ending our week off with Princess Runwilder's Christmas play practice at church. Oh, I almost forgot...forgive me. Her name is "Princess Candy Corn" until after Sunday.

Needless to say, it feels like she's running me all over this week! To top it off, I just realized this morning that I have to make up little treat bags for "Princess Candy Corn's" classmates to send to school tomorrow. Or, atleast I think I'm suppose to send treat bags. I'm not sure when the whole treat bag scene started. But, it almost seems as though its a competition among the parents on whose treat bag the kids like most and which parent can send the most treat bags throughout the year to make the other parents feel like the worst parent ever when their little Princess Runwild comes home and asks why we didn't send treat bags for Columbus Day.  Who are these people!?!?
Last year at Princess Runwild's preschool one mom sent home personalized sand pails filled with candy on "Pool Day." Seriously?!?! Now, Mr. Sweets would probably tell you that I'm just mift about the treat bag situation because I seem to always be outdone in the treat bag area. But, come on people, there needs to be a course or some book of etiquette as to when I'm suppose to send the treat bags! When I ask if treat bags should be sent, I always get a response of "Oh, I don't know. I don't think its necessary. Some do and some don't." Complete evasiveness. Its like there's a Treat Bag Society and they are not accepting new members!
Perhaps, I'll just send a treat bag every other Thursday. But, you know what....then it would probably prompt the Treat Bag Committee to require treat bags ever other day. Of course, no one would tell me because, apparently, I'm not in the Treat Bag Society. I know what you're thinking. And, no,  I am not jealous of the Treat Bag Society. I simply want a schedule for the appropriate sending forth of treat bags. Is that too much to ask?!?!

Ok, so now that I've vented about the treat bags, lets talk about what you could put IN your treat bags. Of course you could do all the plastic Halloween junk and pre-wrapped candy, which I have no problems with at all. In fact, I'll more than likely do some of those myself. But you could also make Harvest Bark for some of your bags. It's very easy and would make a nice treat bag for adults (teachers, co-workers, etc) or kids. As an added treat, you can include a bag topper to make it look extra cute. And, today you are in luck. I took a few minutes to make a few treat bag toppers. Our treat bags will be unique and special. The Treat Bag Society is going to be so ticked off at our cute treat bags!!! If you'd like to download these toppers:

You can download them here and here.

Enjoy!


Harvest Bark
Adapted from Real Simple
Ingredients:
8 oz melted white chocolate or almond bark
1 c. miniature pretzels
1/2 c. candy corn
1/3 c. dried cranberries
Line an 8-inch square baking pan with parchment, leaving an overhang. Spread 8 ounces melted white chocolate in the prepared pan and sprinkle with 1 cup miniature pretzels, ½ cup candy corn, and ⅓ cup dried cranberries.
Chill until firm. Remove from the pan and break into pieces.



Wednesday, October 27, 2010

Old Fashioned Buttermilk Cake Doughnuts-Oct.2010 Daring Bakers Challenge


So, I had just started my regime of “eating clean” when I realized that the October Daring Bakers Challenge was coming due. If you're unfamiliar with the concept, eating clean does not mean you can eat anything that hasn’t been dropped on the floor. Not that kinda clean, but always a good principal nonetheless.. Basically, its no sugar, no white flour, nothing artificial, nothing white, no preservatives, additives, etc. In the words of Jillian Michaels(Biggest Loser) “If it don’t have a Mama or it wasn’t grown in the ground…don’t eat it.” That Jillian, she has such a way with words :) I’ve nearly decided its easier to just stop eating all together. No, no, just kidding. I eat plenty. It’s great. Really…

So, anyways, I hopped over to the Daring Bakers site in hopes of finding something really healthy and “clean” for this months challenge. Yeah, right. This month the challenge was doughnuts. Darn those Daring Bakers:) Hmmm….you have to give me credit. I did even try to Google “Clean Eating doughnuts,”  but I basically kept getting results that doughnuts were NOT part of the clean eating regime. Yeah, yeah. Whatever. I’m just going to be unclean today and have doughnuts. Would you care to join me ? Yes, I thought so….

The October 2010 Daring Bakers challenge was hosted by Lori of "Butter Me Up" who chose to challenge the Daring Bakers to make doughnuts. She used several sources for her recipes including Alton Brown, Nancy Silverton, Kate Neumann and Epicurious.

Doughnuts are big stuff in the Sinful Southern Sweet household. I’ve got two little princesses (who have temporarily, but officially changed their names to Princess Candy Corn and Princess Candy Corny in light of the Halloween season), that have frequent weekend visits to the “Doughnut Store” with their Daddy. So, what I’m getting at is…the kids know doughnuts. I knew they would certainly let me know if they were not up to par.
 I decided on a recipe for an Old Fashioned Buttermilk Cake Doughnut. I really liked the doughnut. The Candy Corn Princesses really L-O-V-E-D the doughnuts. But, much to my surprise….Mr. Sweets said they weren’t that great for him. As I blankly absorbed his mediocre response to my doughnut efforts that had left my kitchen resembling a White Christmas (oh, the flour and powdered sugar that blanketed my countertops!), I wondered if he was just playing around.  But, you know..... I just don’t think he was.  Finally, I told him we would just have to agree to disagree, because they were the best unclean thing I had eaten all week!! 

Enjoy!


Old-Fashioned Buttermilk Cake Doughnuts:
Preparation time:
Hands on prep time - 25 minutes
Cooking time - 12 minutes
Yield: About 15 doughnuts & 15 doughnut holes, depending on size
IngredientsSour Cream ¼ cup
All Purpose Flour 3 ¼ cup + extra for dusting surface
White Granulated Sugar ¾ cup
Baking Soda ½ teaspoon
Baking Powder 1 teaspoon
Kosher (Flaked) Salt 1 teaspoon
Nutmeg, grated 1.5 teaspoon
Active Dry Yeast 1 1/8 teaspoon
Buttermilk ¾ cup + 2 Tablespoon
Egg, Large 1
Egg Yolk, Large 2
Pure Vanilla Extract 1 Tablespoon
Powdered (Icing) Sugar ¼ cup 
Directions:
  1. In a small stainless-steel bowl set over a pot of gently simmering water, heat the sour cream until just warm.
  2. Heat the oil to 375°F/190°C.
  3. Over a large mixing bowl, sift together the flour, sugar, baking soda, baking powder, salt, nutmeg; make a large well in the center. Place the yeast in the well; pour the sour cream over it. Allow it to soften (if using packed fresh yeast), about 1 minute.
  4. Pour the buttermilk, whole egg, egg yolks, and vanilla extract into the well. Using one hand, gradually draw in the dry ingredients. The mixture should be fairly smooth before you draw in more flour. Mix until it is completely incorporated. The dough will be very sticky. Wash and dry your hands and dust them with flour.
  5. Sift an even layer of flour onto a work surface. Don’t be afraid to use a lot of flour. You don’t want the doughnuts sticking to your counter. Scrape dough out of bowl onto the surface; sift another layer of flour over dough. Working quickly, pat dough into an even 1/2-inch (12.5 mm) thickness. Dip cutter in flour and, cutting as closely together as possible, cut out the doughnuts and holes. Place holes and doughnuts on a floured surface. Working quickly, gather scraps of dough together, pat into 1/2-inch (12.5 mm) thickness, and cut out remaining doughnuts and holes.
  6. Drop three to four doughnuts at a time into the hot oil. Once they turn golden brown, turn them and cook the other side. Cooking times may vary, but with my oil at 375 °F/190°C, I found they only took about 20 to 30 seconds per side.
  7. Once cooked, place on a baking sheet covered with paper towels to drain.
Sift powdered sugar over doughnuts and serve.

Tuesday, October 26, 2010

Candy Corn Fudge


So, if you have small children and you allow them to watch even a small amount of television, you are probably familiar with Moose A. Moose and Zee from Nick Jr. (formerly Noggin).
*photo courtesy of Nick Jr.

If that is the case, then you most likely are familiar with the seasonal song now infiltrating every toddler home in America known as “I Don’t Like Candy Corn” That would be Moose singing the song, who does not like candy corn. If for some reason you have not had the pleasure of hearing this psychotically annoying song, let me share. You can view it here.  The song plays no less than 100 times per day during the month of October.  After every showing, my children  say “Mama, why does Moose not like candy corn.? I like candy corn. Moose is strange.”  I couldn’t agree more my little Runwild Princesses. So, in the light of the Trick or Treating season, (and just to tick Moose off), we’re gonna make him some Candy Corn Fudge today.


This is a great way to use up some of your leftover candy corn, if for some reason you have found yourself in an overabundance of candy corn.  It’s a really cute and colorful way to make a simple treat for Halloween.  Of course, it wouldn’t be quite the same without the extra half pound of sprinkles on top.
Enjoy!


Candy Corn Fudge
adapted from here
Ingredients
    • 2 tablespoons butter
    • 3 cups miniature marshmallows
    • 1 cup peanut butter
    • 1/2 cup powdered sugar
    • 20 ounces candy corn ( about 2 1/2 cups)
    • 2 cups roasted peanuts
    • halloween candy sprinkles (optional) or extra candy corn (optional)

Directions

  1. Butter a 9x9 brownie pan (I use a silicone pan but still butter it) and set it aside.
  2. In a deep skillet over low heat, melt butter and marshmallows, stirring constantly, until marshmallows melt.
  3. Add peanut butter and stir until mixed in and melted. Then add powdered sugar, stirring until smooth. Don't add candy and nuts until these are mixed and smooth.
  4. Fold in candy corn and peanuts, stirring until nicely mixed. Some of the candy may start to melt, and that's fine. The candy corn really don't need to melt so don't worry about that.
  5. Pour mixture into the buttered brownie pan, and using a buttered pancake turner, flatten mixture completely.
  6. If you like, sprinkle with extra candy corn or Halloween "cupcake sprinkles", pressing them down with a sheet of waxed paper to keep your hands clean. Be careful not to burn yourself!
  7. Allow mixture to cool, then cut into small square


Monday, October 25, 2010

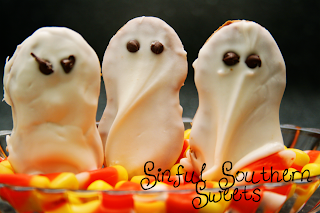
Nutter Butter Ghosts & A Free Halloween Printable Bag Topper


 The first time I ever saw these cute little Halloween treats, was in my HomeEc class in high school. My teacher seemed to always have the cutest ideas. I didn’t really care for her during the portion of the year that we focused on sewing, but that had less to do with her and more to do with my lack of ability. For some reason, I don’t like doing things I’m not good at. Imagine that!
Anyways, my sweet HomeEc teacher taught me how to make these cute little Nutter Butter Ghosts. They are incredibly simple. As long as your candy coating is not too hot, your kids will love making these.

Probably not a treat I would share with a group when I let my girls help, since you can only imagine the finger-licking temptation that leads to bacterial contamination of the dipping chocolate.  It starts out fine. The two little angels dip their little ghosts so neat and tidy. But soon enough one of them, usually the little one, “accidentally” lets her fingertips dip into the candy coating. Well, its all down hill from there. And, you know you can’t get them to wash their hands before repeating the “accidental dipping.” No, the entire bowl of candy coating is already contaminated with little Runwild Princess germies. I think they worked together as a team to accomplish this, knowing well upfront that the goal would be to take control of the white candy coating. Goal accomplished Runwilder Princesses, goal accomplished......

Now, back to the cookies. So, super simple. You only need 3 ingredients.  These would also be soooo very cute bagged up and given as treats for your Trick or Treaters. Here are some I bagged, I created these cute little bag toppers on Photoshop.


And just because I love my Sinful Southern Sweets readers, you can download them yourself here. This is a freebie printable for y'all. After you print them on heavy cardstock, cut them out and fold them in half. Then attach to your cellophane bag with a stapler.
Enjoy!!


Nutter Butter Ghosts

Nutter Butter Cookies
White Almond Bark
Mini chocolate chips

Melt almond bark according to pkg directions, until smooth. Dip Nutter Butter in almond bark. Place on wax paper or silpat. While candy is still wet, place the mini chocolate chips on the ghost for the eyes. Let dry until almond bark is completely set.

Friday, October 15, 2010

Ghost Pops


I’m bored.... I’m sick...... And I’m spotted......
That’s right…. I have waited some 30+/- years to get the chicken pox. THE CHICKEN POX! The lovely doctor. that examined me said that medically, I had made his week. He had not seen a case of chicken pox in over 10 years. Well, what do you say to that. The oh-so-sweet Southern Belle in me wanted to say “Oh, so very glad to be of help.”  The tiny bit of redneck-girl that stays hidden behind that Southern Belle’s debutante gown wanted to hurt the man….and say things that a nice southern girl should not say.  I just glared at the man. As my mother says, everything does not deserve a response.

Anyways, I’m getting behind on all my Halloween treats I want to make, because no one wants to consume food  made by someone that looks like they have leprosy.  So,  today I’m going to show you more of a craft than a recipe. I remember these from when I was a kid. I loved them then and I still love them. They are cute and so simple to make. You probably already have the few things needed to make them. Your kids will love helping with these. And all your little trick or treaters will adore them!

So lets get started.

You will need :
Tissues
Lollipops (I used Dum Dums, but Tootsie Roll suckers work the best)
Markers, Ribbon, wiggly eyes, etc…

I stand my lollipops up in a  bit of florists foam. Its not necessary, but it helps. Cover your lollipops with a
Single tissue. Then tie a bit of ribbon around the sucker (where the candy meets the stick).
  Really, you should probably use orange or black ribbon. That’s a bit more festive. But if you have chicken pox and are stuck at home, you can use any darn color you want.  If you want them to look like they stepped off the set of Rainbow Brite, well, you go right ahead.
 Then, decorate the ghosts face. You can use a marker and just draw his/her face.


Or you can use cute little googly, wiggly eyes. They’re pretty cute.


And, if you have the chicken pox…by all means, you can use a red marker and make your little ghost have dots just like you.
Hehe!
Really you could decorate these any number of ways. The sky’s the limit. Think of how cute they’d be with a little yarn for hair. Have fun making these. I’m going to go recover and be thinking of all the cute Halloween treats I’m going to blog about next week!
Enjoy!

Thursday, October 7, 2010

Owl Cupcakes

Hhooo-Hhoo’s ready for fall…..
Ok. I know. That was about as corny a lead-in to a post as possible, but I simply couldn’t help myself. I mean look at these cute guys. 


I adore fall. When it does finally arrive here in the South, it is welcomed with open arms. Southerners know how to appreciate the first relief from soaring temperatures. The cooler temps and slight breezes  are a near perfect combination. It’s all we can do to stay inside to get our necessary indoor-work accomplished.   It also seems that everyone is ready to start bring out their fall decorations the moment the first chill is in the air.  Lots of pumpkins and scarecrows flanked by beautiful pots of mums.  This year it seems that owls are also making a huge appearance in the fall scene. I’ve been seeing them every time I turn around in the stores and online. 

When I found these cute cupcakes in Hello Cupcake! ,  I knew I had to give them a try. Amazingly, they are very simple. Your kids or grandkids would love helping with these, unless you’re making them at night and you fear the mega sugar overload that could occur from the helpers consuming the decorations. That’s what went down at my house. Since Little Runwilder has decided that she loves to bake, I almost feel like I'm hiding in the kitchen doing something of an illegal nature when/if she catches me. She will march into the kitchen with her most demanding voice and say “I must bake it!”
God, I love that little kid. I must say I can relate…I feel the same way sometimes.

I will offer one word of advice.  I do not recommend you use the el cheapo version of Oreos (aka off brand). I did. And they do not twist the white icing off on both sides. The white stays on one side and you end up having to use 2 cookies to get eyes for one owl.  And, to make matter worse, you have little bits of the cookie on the white (that makes for dirty owl eyeballs :(  so you must use a knife to scrape that away so that you’ll have perfectly white owl eyes. Seriously, just spend a buck more and get the real Oreos.  I will say despite my use of off-brand Oreos and the extra work on my part, my little taste-testers did not seem to have any complaints. See for yourself...

Little Princess Runwilder, aka "Miss I Must Bake it!"
"Yikes, my mommy needs to dress me in disposable clothes"
Princess Runwild, thank goodness one of you knows how to properly consume a cupcake with little/no waste.

Enjoy!


Owl Cupcakes
adapted from Hello Cupcake!


12 chocolate cupcakes
1 can chocolate frosting
24 Oreos
Medium bag of M&M’s

1. Separate the Oreos. You might want to microwave them for a few seconds first. Use a knife to remove any crumbs from the cream filling.
2. Using a serrated knife, make 2 parallel cuts 1/2 inch in from the edge on each plain cookie half. The two outside edges will be used for the ears.
3. Spoon 1 cup of chocolate frosting into a Ziploc bag, press out any excess air and set aside. Spread the remaining frosting on the cupcakes.
4. Using a little frosting, attach 2 of the large ear pieces, rounded sides in and about 1 1/2 inches apart, on top of each of the cupcakes. Angle the ears slightly away from each other, and allow them to extend about 3/4 inch beyond the edge of the cupcake.
5. Place two cream-sided cookie halves, cream side up, on the upper half of each cupcake to make the eyes.
6. Snip an 1/8-inch corner from the bag with the chocolate frosting. Pipe lines of frosting along the length of the cookie ears to cover. Starting with the edge at the top of the cupcake, pipe the feathers with the frosting using a squeeze-and-pull motion. Work inward from the edge in slightly overlapping rows until the section above the eyes is covered. Pipe a few feathers on the edge just below each eye.
7. Press a yellow M&M in the middle of each cupcake to make the beak. Use a dot of frosting on the cream of each cookie to attach a brown M&M to the eyes of the cupcakes.